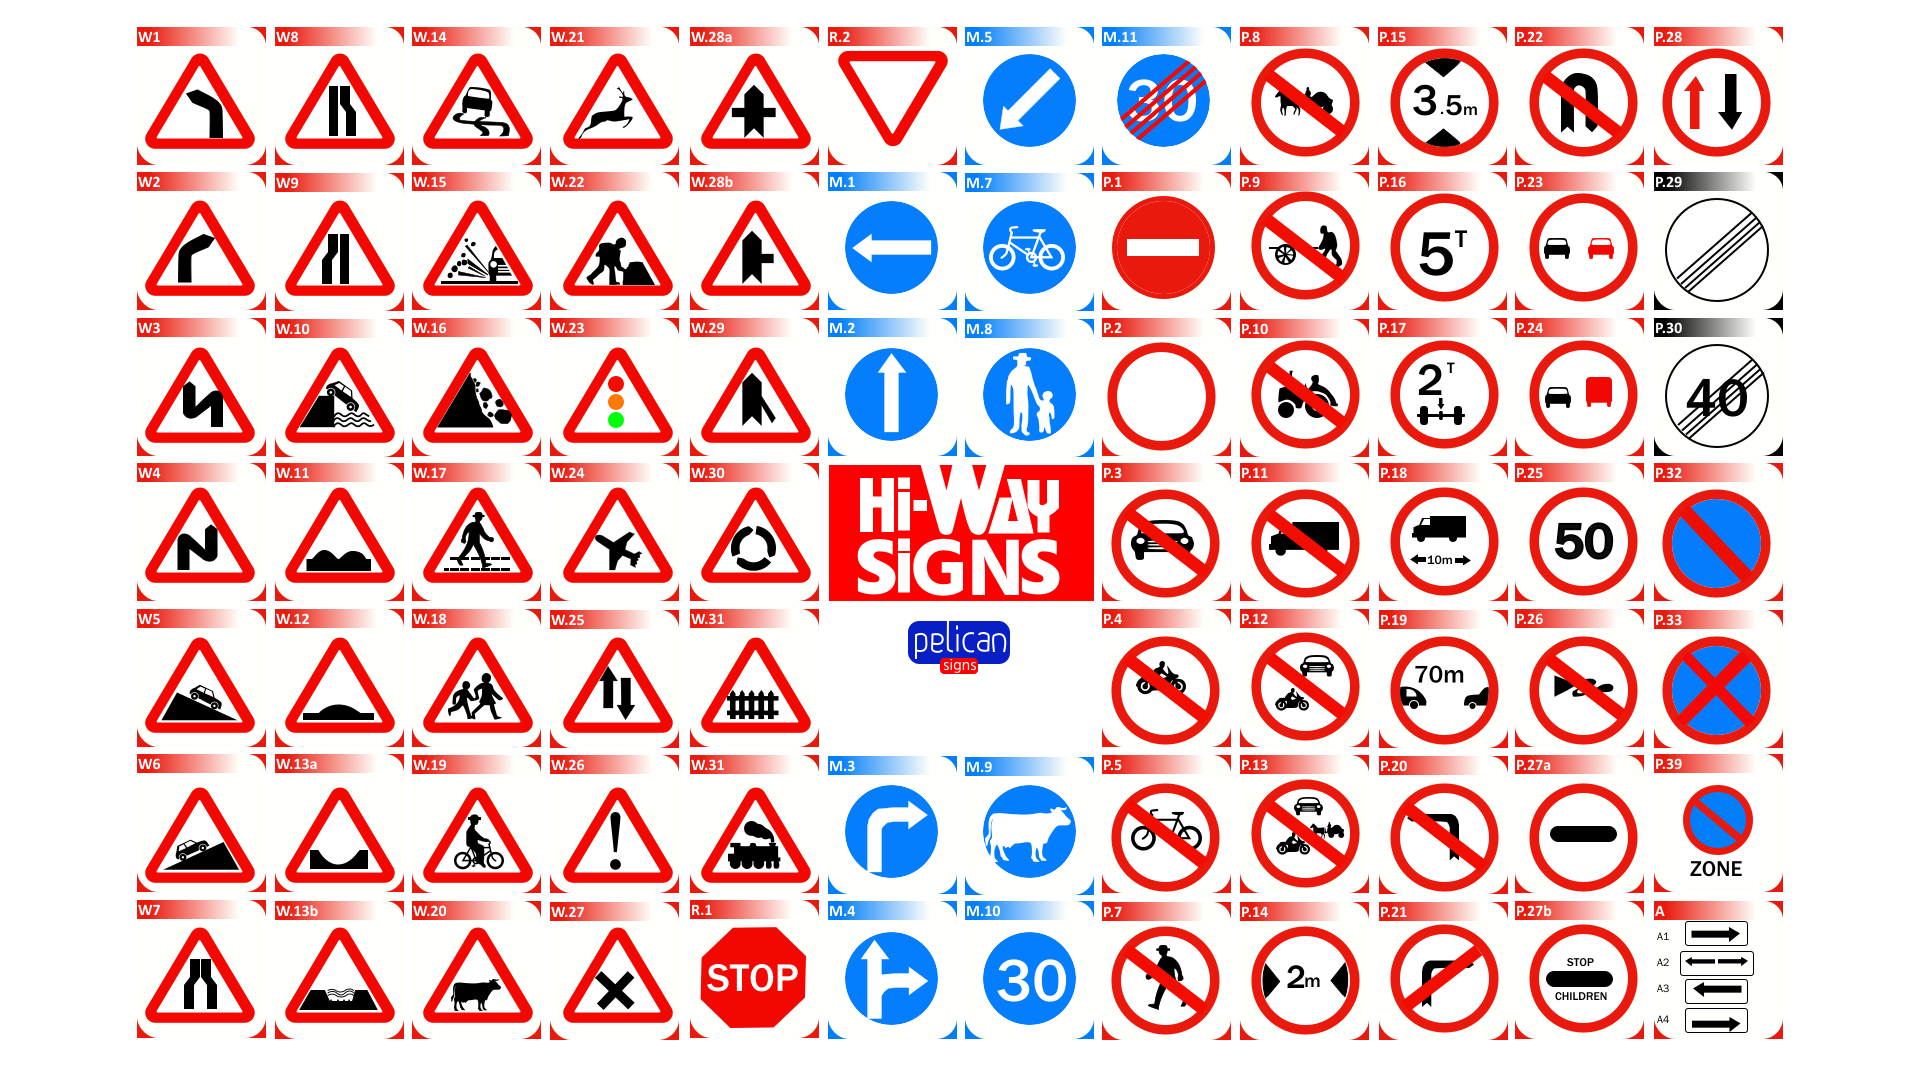
Pelican road signs chart
We zoom into one sign on the chart. Name it before the answer shows, then mark whether you knew it. Misses come back sooner.
How the the Pelican chart trainer works
- 01
Pick what to practise. Practise all 83 signs, or open the settings and choose one class at a time, such as warning or prohibitory signs. You can keep them in chart order or shuffle them for each run.
- 02
We zoom into one sign. The camera moves across the chart and stops on a single sign. The rest of the chart dims and blurs, so your eyes stay on the sign in front of you.
- 03
Name it before the answer shows. Say the name out loud or in your head. The answer appears after a short timer, or when you tap if you prefer to go at your own pace. It shows the sign's name, its code and what to do when you meet it.
- 04
Mark whether you knew it. Tap Knew it or Missed it. Signs you miss come back later in the same run, so a run only ends once you've recalled every sign in it.
- 05
Watch the known meter build. Recall a sign cleanly a couple of times and it counts as known. A miss only nudges it down a notch. Your progress is saved on this device, with no account needed.
Why learn the signs on a chart
Seeing the signs laid out together shows you the system behind them. Triangles warn you, red rings forbid, blue circles give orders, and the two priority signs have shapes all of their own. Once you see the pattern, a sign you've never studied still tells you what kind of message it carries.
A chart also gives your memory a map. You remember where a sign sat and what was next to it, which helps when two signs look alike. Naming each one before you see the answer is harder than reading a list, and that effort is what makes it stick.
Tips that make the signs stick
- Short runs most days beat one long session the night before your test.
- Learn one class at a time, then switch to shuffle so the order can't give the answer away.
- Be strict when you mark yourself. If you hesitated or only got half the name, tap Missed it.
- When a sign keeps beating you, open its page from the list below. Each one explains the signs it's often confused with.
- Once the chart feels easy, try the same signs in 3D, where you see them from an angle like on the road.
All 83 signs in this trainer
Warning signs · 34
Warning signs are red-bordered triangles pointing up. They don't order you to do anything: they tell you what's coming so you can slow down and get ready.
- Bend left W.1
- Bend right W.2
- Successive bends to the left W.3
- Successive bends to the right W.4
- Steep descent ahead W.5
- Steep ascent ahead W.6
- Road narrows ahead W.7
- Road narrows from right W.8
- Road narrows from left W.9
- River bank or quayside W.10
- Uneven road surface ahead W.11
- Severe bump ahead W.12
- Severe dip ahead W.13(a)
- River bend crossing (drift) ahead W.13(b)
- Slippery road W.14
- Loose surface road W.15
- Danger of falling and fallen rocks ahead W.16
- Pedestrian crossing W.17
- Children crossing ahead W.18
- Cyclists W.19
- Cattle crossing ahead W.20
- Wild animals W.21
- Road works ahead W.22
- Traffic light signals ahead W.23
- Low-flying aircraft crossing ahead W.24
- Two-way traffic ahead W.25
- Hazard ahead W.26
- Road junction ahead W.27
- Junction ahead: stop or give way W.28(a)
- Junction ahead with road entering from right W.28(b)
- Junction ahead with acceleration lane from right W.29
- Roundabout ahead W.30
- Rail crossing with barrier W.31
- Rail crossing without barrier W.32
Priority signs · 2
Priority signs tell you who goes first at a junction. Their shapes are unique, a red octagon for STOP and a triangle standing on its point for GIVE WAY, so you can recognise them at a glance.
Mandatory signs · 10
Mandatory signs are blue circles, and they tell you what you must do. If you see a blue disc, it's an order rather than a suggestion.
- Direction to be followed M.1
- Vehicles travel straight M.2
- Vehicles turn right junction M.3
- Vehicles travel straight or right M.4
- Pass to the left M.5
- Compulsory cycle track M.7
- Compulsory pedestrian foot path M.8
- Compulsory track for cattle M.9
- Compulsory minimum speed M.10
- End of compulsory minimum speed M.11
Prohibitory signs · 33
Prohibitory signs are mostly circles with a red ring, and they tell you what you must not do or set a limit you must keep. They're the opposite of the blue circles, which tell you what you must do.
- No entry P.1
- Road closed P.2
- Entry forbidden to all vehicles P.3
- Entry forbidden to all motor cycles P.4
- Entry forbidden to all bicycles P.5
- No entry for pedestrians P.7
- No entry for animal drawn vehicles P.8
- No entry to all hand carts P.9
- No entry for farm vehicles P.10
- No entry for heavy commercial vehicles P.11
- No entry for power driven vehicles P.12
- No entry for power driven or animal vehicles P.13
- No entry for vehicles exceeding width shown P.14
- No entry for vehicles exceeding height shown P.15
- No entry for vehicles exceeding weight shown P.16
- No entry for vehicles exceeding weight shown on one axle P.17
- No entry for vehicles exceeding length shown P.18
- No entry: vehicles must keep minimum distance shown P.19
- No left turn P.20
- No right turn P.21
- No U-turn P.22
- Overtaking of four-wheeled vehicles prohibited P.23
- Overtaking of goods vehicles prohibited P.24
- Speed limit P.25
- Sounding of horns or sirens prohibited P.26
- Stop at control post P.27a
- Stop: children school P.27b
- Priority for on-coming traffic P.28
- End of all prohibitions P.29
- End of speed limit P.30
- Parking prohibited P.32
- Parking or waiting prohibited P.33
- No stopping zone P.39
Additional panels · 4
Additional panels are small rectangles fixed under a main sign. They add detail such as a distance, a direction or a time, and they never apply on their own.